Did you know that once, during the Victorian era, people would place candles directly on their Christmas trees?
Affixed with a bit of melted wax and some metal pins, the candles were glued to the branches and then set alight to create a spectacular glow. Unsurprisingly, the risk of a house fire was quite high, so eventually, folks began using candle holders, glass balls and small lanterns instead. 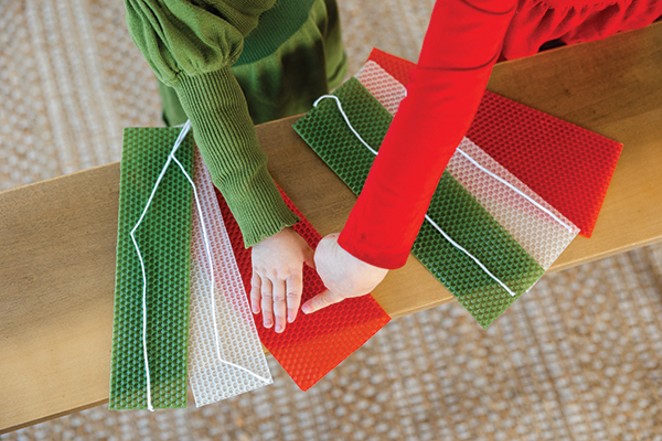
While the Christmas tree tradition may have evolved from candles to twinkling lights, we can still enjoy the magic of the season by making our own festive holiday candles to give as gifts or simply to enjoy at home during those cold, dark winter nights.
Unlike paraffin wax, all-natural beeswax candles provide a clean, healthy burn free of any chemical irritants or pollutants, perfect for little ones at home.
“Beeswax is a natural lipid, created by honeybees to build the comb in their hive,” says Allen Eagle, president of the Central Oregon Beekeepers Association. “For wax candles, both beeswax as well as paraffin wax (what we used to put over the jelly in the jelly jar) are the most common. My favorite is beeswax (I’m a bit biased, as I’m a beekeeper), because it has the wonderful golden color and a great honey aroma.”
Best of all, kids of all ages—even preschoolers and kindergarteners – can join the fun, as the activity doesn't involve any heating or melting. The only adult assistance needed may be to get the kids set up at the table and to cut the beeswax.
First, you will need to secure some flat sheets of beeswax, a cotton wick and any extra decorations you might like to include, like dried fruit or colorful ribbons. You can easily buy an all-inclusive candle rolling kit online with everything you need for about $30 or stop by Wild Child toy shop at the Old Mill District to buy one in person.
Here is a step-by-step guide. Have fun and enjoy!
Affixed with a bit of melted wax and some metal pins, the candles were glued to the branches and then set alight to create a spectacular glow. Unsurprisingly, the risk of a house fire was quite high, so eventually, folks began using candle holders, glass balls and small lanterns instead.

Natalie Stephenson
While the Christmas tree tradition may have evolved from candles to twinkling lights, we can still enjoy the magic of the season by making our own festive holiday candles to give as gifts or simply to enjoy at home during those cold, dark winter nights.
Unlike paraffin wax, all-natural beeswax candles provide a clean, healthy burn free of any chemical irritants or pollutants, perfect for little ones at home.
“Beeswax is a natural lipid, created by honeybees to build the comb in their hive,” says Allen Eagle, president of the Central Oregon Beekeepers Association. “For wax candles, both beeswax as well as paraffin wax (what we used to put over the jelly in the jelly jar) are the most common. My favorite is beeswax (I’m a bit biased, as I’m a beekeeper), because it has the wonderful golden color and a great honey aroma.”
Best of all, kids of all ages—even preschoolers and kindergarteners – can join the fun, as the activity doesn't involve any heating or melting. The only adult assistance needed may be to get the kids set up at the table and to cut the beeswax.
First, you will need to secure some flat sheets of beeswax, a cotton wick and any extra decorations you might like to include, like dried fruit or colorful ribbons. You can easily buy an all-inclusive candle rolling kit online with everything you need for about $30 or stop by Wild Child toy shop at the Old Mill District to buy one in person.
Here is a step-by-step guide. Have fun and enjoy!
- Trim the wick to an inch longer than the beeswax sheet.
- Decide what style of candle you want to make—fat and round or tapered
and slim.
- For a fat and round candle, simply press the wick lengthwise onto the edge of the beeswax sheet, roll the beeswax over the wick and press tightly to secure it. Then start rolling your wrapped wick like a burrito until you reach the end.
Hot Tip: Briefly heat the candle with a blow dryer first to make it a bit more malleable and easier to roll. Apply an extra blast of heat at the end of the sheet to fuse the two pieces together.
- For a tapered candle that’s wider on the bottom than on the top, use a utility knife to cut the sheet into a trapezoid shape with the larger edge on the bottom and the smaller side on top. Then roll the wick up in the sheet until you reach the end and press your fingers to seal it tight, just like in step 3.
- Cut or tear bits of colorful beeswax to add as decoration. Have fun designing your candle. Perhaps you might like to make a bow out of white lace or burlap thread or tie on dried orange slices, scented cinnamon sticks or red holly berries. Use your imagination!